Blogpost: Be a Student of the Socket
Be a student of the socket.
Become an expert at reading the post-extraction site, the post-op radiograph, and any other “after-action” metrics you can gather. If you want to improve quickly and consistently, there are few habits more powerful than learning to examine your work with calm honesty—right after the procedure, while the details still matter.
There’s a concept in physics called Hawking radiation—the idea that the faint radiation emitted by a black hole might carry clues about its “past life.” It sits at the heart of the Black Hole Information Paradox: the notion that what seems lost may still leave a readable signature.
In oral surgery, our equivalent “black hole” is the extraction socket—the dark, quiet space that remains after the tooth is gone. And just like a black hole, the socket holds a story. The immediate post-extraction site can reveal exactly what happened during the procedure: what went well, what was risky, and what you should refine next time.
The lesson I learned as a first-year resident
This concept was first taught to me by my chief resident when I was a PGY-1. I watched him extract a lower third molar, and after he removed #32—before moving on—he left the retractor in place and said, “Look over my shoulder. Look at this.”
I peered into the socket. He pointed to a faint line along the lingual plate and said, “See that? That’s where my bur kissed the lingual plate while I was sectioning. I went too deep. We don’t want to touch the lingual plate because we can risk nerve injury. There’s so much to learn by examining the extraction site.”
What stayed with me wasn’t just the technical detail—it was his humility and his mindset. He was willing to show me a mistake in real time, and even more, he was studying himself like a scientist. That posture—honest, curious, improvement-oriented—is a superpower in surgery.
Think like an athlete watching film
Another analogy is professional athletes watching game tape. They slow it down, freeze-frame the moment of failure, and ask: What happened here? What did I miss? What should I do differently next time?
That’s exactly what the socket can be for us: game tape you can examine immediately.
What I look for after a third molar extraction
Right after removing a third molar—especially #17 or #32—I pause, irrigate, suction, and inspect. Here are some of the “tells” I look for and what they usually mean:
-
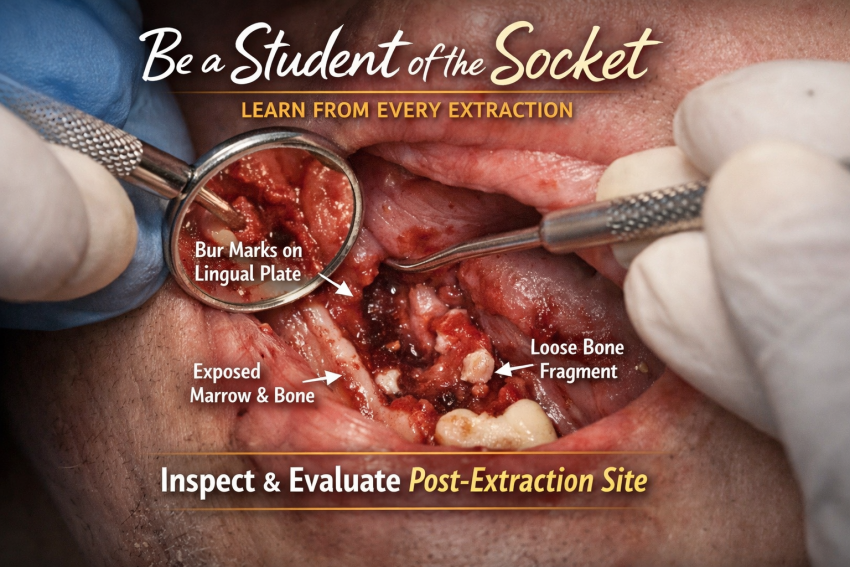
Bur marks on the lingual plate
If I see this, it usually means my sectioning depth or bur angulation drifted lingual. That’s a technique flag and a reminder: protect the lingual plate and respect the lingual nerve. -
Cracks or mobility of the lingual plate
This often suggests excessive buccal pressure during elevation—pushing the tooth hard toward the lingual. That’s a cue to refine how I’m supporting the tooth and controlling force vectors. -
Bur marks on the floor of the socket
If I see bur marks apically, I likely sectioned too deep toward the inferior alveolar canal region. This is one of the clearest “learn-from-it-now” findings. -
Bur marks on the distal root surface of the second molar
A sign my troughing came too far mesial. It’s a reminder to be intentional about the boundary and protect the adjacent tooth. -
Missing cortical bone from the floor (exposed, “marrow-like” bleeding bone)
Often seen on the mesial aspect of a horizontally impacted third molar site. This can mean I troughed too deep mesially and then elevated aggressively, removing cortical bone along with the tooth. -
Loose bony fragments on the distal-lingual crestal area
These often happen when insufficient coronal bone is removed and the tooth is elevated against thin crestal bone. If those fragments are left behind, they can become sharp, annoying sequestra during recovery—so I actively look for and remove them. -
Does the flap “snap” back into place when I release the retractor?
If it doesn’t, I ask why. Sometimes it’s because of excessive retraction causing a mesial tear—often due to insufficient posterior extension of the incision, or inadequate release that would allow the flap to drape without tension.
None of this is about self-criticism. It’s about becoming fluent in the feedback your surgery is already giving you—quietly, every day.
Other places to practice this “scientist learner” habit
You can bring this mindset to almost every part of oral and maxillofacial surgery:
-
Post-implant radiographs or CBCT
-
Evaluate position in all dimensions
-
Note proximity to adjacent roots, sinus floor, IAN, and planned prosthetics
-
Identify what you’d repeat and what you’d adjust
-
-
Post-ORIF imaging
-
Plate position, screw length, reduction quality, condylar seating
-
Compare what you intended vs. what you achieved
-
-
Two-week follow-ups after third molars
Ask targeted questions:-
How severe was the pain—and how did it progress day by day?
-
Which site hurt the most?
-
What relieved it?
-
Any medication side effects or compliance issues?
-
We spend a lot of effort thinking about sectioning, cracking, and elevating—but we don’t always ask the important downstream question:
How did all of that affect the socket and the surrounding bone?
And just as important: How close did I come to the structures I’m trying to protect?
Action points
-
Next extraction: pause for 20 seconds. Irrigate, suction, and inspect the socket.
Make one mental note about what went well and one note about what you’ll refine next time. -
Next post-op implant CBCT: review systematically in every plane.
Identify one “win” and one “adjustment,” specifically tied to anatomy and prosthetic goals.
If you do this consistently, you’ll be amazed how fast your technique tightens up—not from more CE, not from more gadgets, but from actually learning from what your hands already did.